In part three you will learn how to create a custom item creator. The item creator will allow you to create low gravity items using a GUI.
For this purpose we create:
- An item creator which is a derma control that contains the GUI to create and edit an item
- An item persistence which is an abstraction to save item class configuration to the database
We also edit
- The module definition, adding a Blueprint that links our item creator, base and persistence
- The item base, adding logic to create item classes from the item persistence
NOTE: This tutorial is the third part of a tutorial series to create a full blown pointshop 2 item creator.
In part one a simple item class and slot were created, in part two an item base was added. Part 1, Part 2, Part 3
Prerequisites
You will need the code of part two of this tutorial: Download Part 2 Source
Making items on the fly
To understand how Pointshop 2 saves items into the database recall how item classes are handled:
There is a hierachical system of item bases. The base (“root”) item base is always base_pointshop_item. This item base contains properties that all items have: a name, a description, a price and so on.
Then we have our low gravity base, which also has a gravity multiplier property. We have created a custom item base, which inherits the pointshop item base.
An item base itself cannot be put into the shop for sale, it just defines common properties of item classes. An item class in the end is what you can see in the shop.
To make it possible to create multiple different low gravity items (=item classes) that can be sold in the shop, we therefore need to be able to create and save item classes dynamically
One way to do this would be to generate the lua files in a similar way that we hand created them in Part 2. In Pointshop 1 most item creators would do it this way. In Pointshop 2 we simply store customized properties into the database and create the classes on the fly.
The way this is done in code is illustrated here: 
We will start with Step 1 which means creating the Persistence Class.
Step 1: Creating the item persistence
To save item data into the database we use something that’s called a “persistence”. A persistence is an abstraction to the database (so that we can use the same code for SQLite and MySQL) and also adds functionality such as item import/export.
Create addons/ps2-lowgravity/lua/ps2/modules/lowgravity/sh_model_lowgravitypersistence.lua
-- Define the class
Pointshop2.LowGravityPersistence = class( "Pointshop2.LowGravityPersistence" )
local LowGravityPersistence = Pointshop2.LowGravityPersistence

-- Link to the Pointshop2 Database
LowGravityPersistence.static.DB = "Pointshop2"

-- Define model fields
LowGravityPersistence.static.model = {
    -- Name of the SQL Table
    tableName = "ps2_lowgravitypersistence",

    -- Table columns:
    fields = {
        -- Foreign key, needed to link to the basic item info row
        itemPersistenceId = "int",

        -- Our gravity multiplier
        multiplier = "luadata",
    },

    -- Link to the item persistence of base_pointshop_item
    belongsTo = {
        ItemPersistence = {
            class = "Pointshop2.ItemPersistence",
            foreignKey = "itemPersistenceId",
            onDelete = "CASCADE",
        }
    }
}

-- Include Database Logic (creating tables, adding accessor functions)
LowGravityPersistence:include( DatabaseModel )

-- Include EasyExport: Makes it possible to import/export the item
LowGravityPersistence:include( Pointshop2.EasyExport )

--[[
    Called by the Item Creator to update or create a persistence.
    Args:
    - saveTable: A table of custom fields created by the creator
    - doUpdate: A boolean, true if we are updating an item, false if
                creating it.
]]--
function LowGravityPersistence.static.createOrUpdateFromSaveTable( saveTable, doUpdate )
    -- call the base item createOrUpdateFromSaveTable to save basic item info (description, name, price, etc.)
    return Pointshop2.ItemPersistence.createOrUpdateFromSaveTable( saveTable, doUpdate )
    :Then( function( itemPersistence )
        if doUpdate then
            -- Find the database row to update
            return LowGravityPersistence.findByItemPersistenceId( itemPersistence.id )
        else
            -- Create a new database row
            local weaponPersistence = LowGravityPersistence:new( )
            -- link the basic item info
            weaponPersistence.itemPersistenceId = itemPersistence.id
            return weaponPersistence
        end
    end )
    :Then( function( lowGravPersistence )
        -- Set our custom properties
        lowGravPersistence.multiplier = saveTable.multiplier
        return lowGravPersistence:save( )
    end )
end
We create the persistence class, include common functionality and define the data model. For more information about data models please see the LibK Readme. Here we use a “luadata” datatype for storing our multiplier, which allows us to save arbitrary lua variables (tables, strings, numbers).
It is important to put our persistence into the Pointshop2 Table (see line 1 above) so that the model is picked up by the initializing system.
The most important part of this snipped is the “createOrUpdateFromSaveTable” function. When an item creator (the GUI to create items) is used, it creates a table containing all item properties. This table is sent to the server, then passed to the the “createOrUpdateFromSaveTable” function. The second argument “doUpdate” determines whether we should save edits to an existing item or create a new one.
The Pointshop2 item base also has a persistence class, which saves the basic data (name, description etc). When our “createOrUpdateFromSaveTable” function is called we need to call the base persistence function as well. If we are creating a new item, this function also creates a new row in the basic item information table, which we need save in our persistence to find it again later.
When we change the map Pointshop2 picks up our persistence and automatically creates the table that we defined in the database: 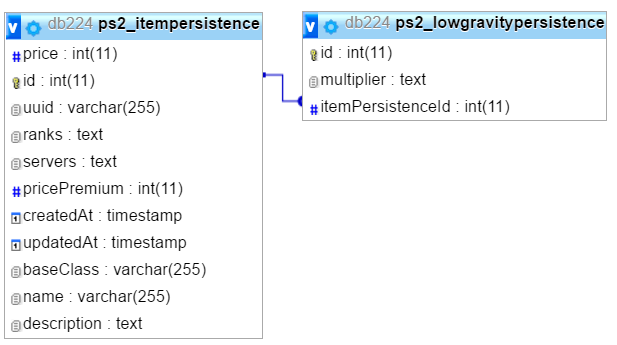 .
.
Note: You might have wondered about the names of Pointshop 2 generated item classes. They are in the format KInventory.Items.[Number]. The number is simply the persistence id of the basic item persistence that the item was generated from.
This diagram illustrates the way item classes are saved (don’t worry if you don’t fully get it yet, it will become clear later):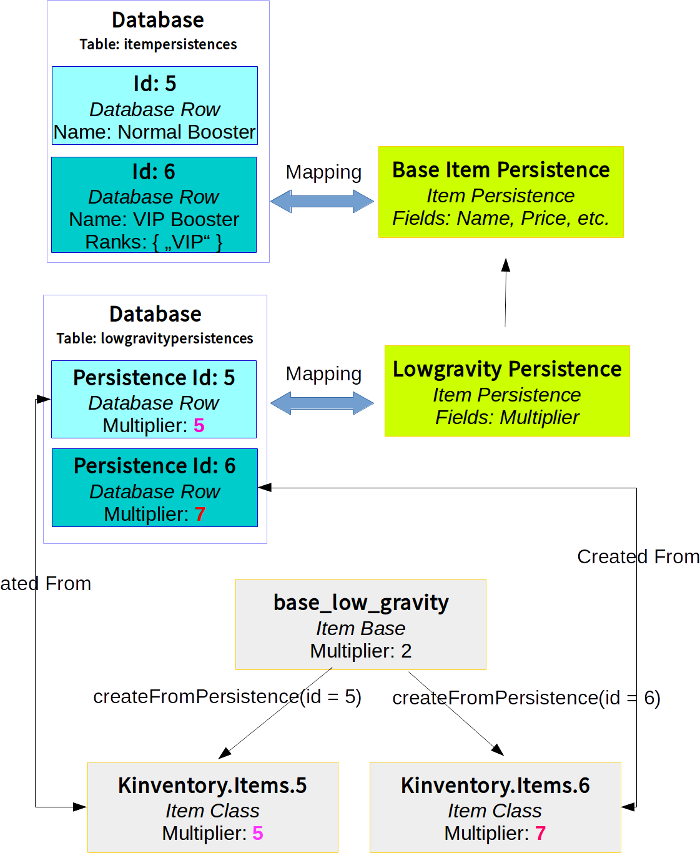
Step 2: Adding a Creator
Now that we have created the sql table and code to map data into it, we need to create the GUI to make it possible to easily create new item classes on the fly.
And again Pointshop 2 has some components that you will extend to make your custom creator. Let’s dive straight into the code:
Create addons/ps2-lowgravity/lua/ps2/modules/lowgravity/cl_DLowGravityCreator.lua
local PANEL = {}

function PANEL:Init( )
    -- Derma will call DItemCreator_Steps.Init here automatically
    -- Which creates the first step with the basic pointshop item information

    -- Create a DLowGravityCreator_Stage1 which we will define later
    self.lowgravPanel = vgui.Create( "DLowGravityCreator_Stage1" )

    -- Add our custom control to the steps list
    self.stepsPanel:AddStep( "Low Gravity Settings", self.lowgravPanel )
end

-- Create a new Derma Control called DLowGravityCreator, using the functions from the PANEL Table
-- and use DItemCreator_Steps as base control.
vgui.Register( "DLowGravityCreator", PANEL, "DItemCreator_Steps" )
We have just created a new Derma Control using vgui.Register. This control uses
DItemCreator_Steps as base, which is the basic creator supplied by Pointshop 2. It definies the part where when you create an item you input the name, description, price, until the point where you click “Next” in the bottom right.
When you click “Next”, the Creator will navigate to the next step which we added to our custom creator using AddStep. This is the part that we will customize, which is where the user puts in their multiplier. To do this we need to create DLowGravityCreator_Stage1:
Create addons/ps2-lowgravity/lua/ps2/modules/lowgravity/cl_DLowGravityCreator_Stage1.lua
local PANEL = {}
function PANEL:Init( )
self.infoPanel = vgui.Create( "DInfoPanel", self )
self.infoPanel:SetSmall( true )
self.infoPanel:Dock( TOP )
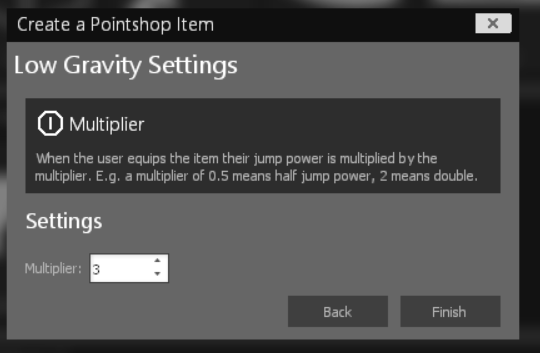
self.infoPanel:SetInfo( "Multiplier",
[[When the user equips the item their jump power is multiplied by the multiplier. E.g. a multiplier of 0.5 means half jump power, 2 means double.]] )
self.infoPanel:DockMargin( 5, 5, 5, 5 )
-- Add a title
self:addSectionTitle( "Settings" )
-- Add a Number Wang control
self.multiplierWang = vgui.Create( "DNumberWang" )
local pnl = self:addFormItem( "Multiplier", self.multiplierWang )
-- Set Default Value
self.multiplierWang:SetValue( 2 )
end
function PANEL:SaveItem( saveTable )
saveTable.multiplier = self.multiplierWang:GetValue( )
end
function PANEL:Validate( saveTable )
if self.multiplierWang:GetValue() < 0 then
return false, "Multiplier must be greater or equal to zero."
end
return true
end
function PANEL:EditItem( persistence, itemClass )
self.multiplier:SetValue( persistence.multiplier )
end
-- Override background painting
function PANEL:Paint() end
vgui.Register( "DLowGravityCreator_Stage1", PANEL, "DItemCreator_Stage" )
We created a new control called DLowGravityCreator_Stage1 which uses the Pointshop2 supplied DItemCreator_Stage as base. The DItemCreator_Stage control is in the end just a basic panel but it has two functions for laying out UI: addSectionTitle and addFormItem.
Why so many classes?: This way of programming Derma is quite nice since you can compose gui very easily. If you’ve been manually positioning elements without before, this will look a bit strange. If you are creating a Pointshop 2 DLC you are free to “steal” parts of the GUI code from the official addons if you find a control useful.
In the PANEL:Init() funtion we simply create our GUI controls. This is an info panel to inform users about how to use our creator, a subheading and a DNumberWang. (Don’t ask me why it’s called that, it’s this thing:
 ).
).
The PANEL:SaveItem( saveTable ) method populates the save table with the information collected in this step. Here we simply set the multiplier value to the value of the number thing (set it to the value of the wang sounds wrong :X).
After SaveItem is called, PANEL:Validate( saveTable ) is called. The saveTable is the same one that was passed to saveTable but in this method we simply make sure that all the data makes sense. We return true if all is good, or false and an error message to trigger a validation error.
This would already allow us to create items but we still need editing, for this PANEL:EditItem( persistence, itemClass ) is called. This method takes the properties of the item class and updates the UI with the values so that they can be edited.
Why two arguments in EditItem?: The persistence is the database persistence row of the item that is edited, the itemClass is the class generated from the persistence. These both contain the same data! They are both passed simply for convenience (sometimes you want to apply transformations to the data and it may be easier to get it from the persistence or class).
That’s all! Our creator is set to go. We now have everything to save class properties to the database. What’s left is the loading stage: Where we take the data and turn it into an item class.
Step 3: Extending the item class
This part is actually really easy, the item base contains a function called generateFromPersistence( itemTable, persistence ). This method is passed an itemTable (this corresponds to the ITEM when we create a item class in a file). It already has the base class set, so all we need to do is add our properties:
-- Tell the shop which persistence class to use to generate item classes for this base
function ITEM.static.getPersistence( )
    return Pointshop2.LowGravityPersistence
end

function ITEM.static.generateFromPersistence( itemTable, persistence )
    -- Call the parent's generateFromPersistence to populate default fields such as name, price, description.
    ITEM.super.generateFromPersistence( itemTable, persistence.ItemPersistence )

    -- Set the class properties from the persistence
    itemTable.multiplier = persistence.multiplier
end
Why persistence.ItemPersistence?: When LibK loads the persistence model from the database and a relationship is defined it is loaded to the model automatically. We defined this in our persistence under “belongsTo”.
We also add the function getPersistence() which tells the shop to use the Pointshop2.LowGravityPersistence class to look up item classes for this base in the database.
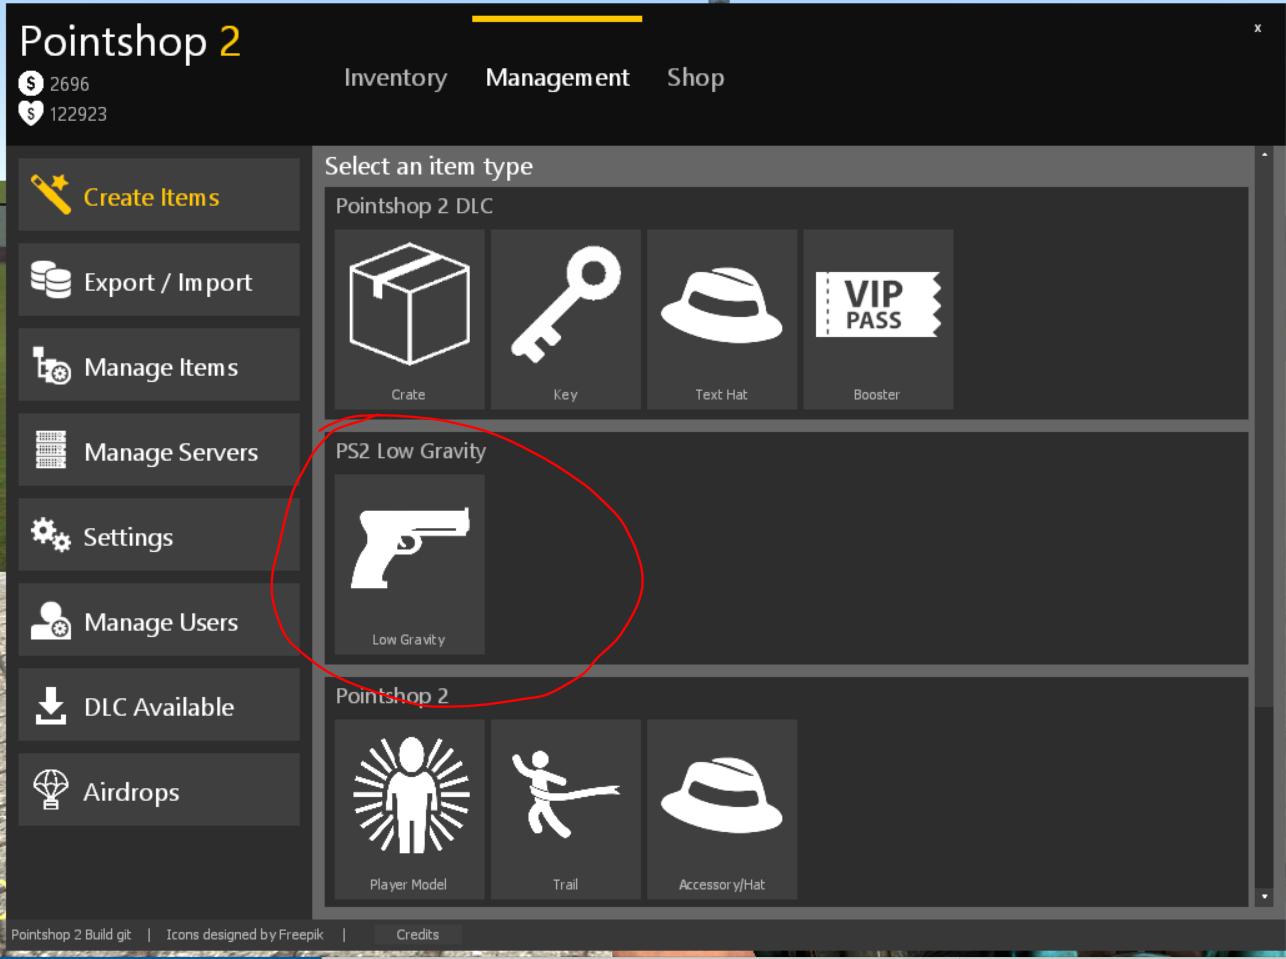
Step 4: Putting it together - Adding the blueprint
Now that we have everything in place it’s time to update our module definition so that the Low Gravity Item has a button in the Create Items section. This should be quite self-explanatory.
MODULE.Blueprints = {
    {
        label = "Low Gravity",
        base = "base_low_gravity",
        icon = "pointshop2/crime1.png",
        creator = "DLowGravityCreator",
        tooltip = "Create low-gravity items."
    }
}
That concludes the tutorial. If you have any questions please post in the comments below.
